Elden Ring's Main Bosses Ranked From Worst To Best
"Elden Ring" is the newest release from developer FromSoftware, and its bosses are quickly becoming legendary. With countless mini-bosses and overwhelming enemy encounters, "Elden Ring" racks up a list of some epic battles. However, nothing quite reaches the scale of the game's main boss fights.
Cutscenes, backstories, and move-sets differentiate these bosses from all others found in the game. Lore-wise, many of the following creatures are "demigod shardbearers" who are considerably more powerful than run-of-the-mill field and dungeon bosses. As such, they are integral to the plot of the game. Some of them can even be considered the scariest enemies in "Elden Ring."
The following boss battles are, for the most part, required to complete the journey of "Elden Ring." That means secret bosses such as Mohg and Malenia will not be included in the ranking. The same goes for bosses required to complete side objectives, like Radahn in Ranni's quest. It is also important to mention that this ranking will not be based entirely on difficulty level. Elements such as rewards, importance to the lore, and overall presentation will be considered.
At the end of the day, "Elden Ring" puts exploration at the forefront, but if one were to only follow a strictly linear path, they would meet some of the most detailed and difficult obstacles in the game.
12. Godskin Duo

Godskin Duo seems like an attempt at recreating the magic found in the Ornstein & Smough battle from "Dark Souls." The most recognizable trait this boss shares with one of FromSoftware's most unique battles is having to fight two figures at once, as well as a few design elements. But the combo of recycled enemies and a harsh difficulty curve put this battle dead last.
What made the fight with Ornstein & Smough so great was its balanced design. Players could separate the two by utilizing the room's pillars. Tying it all together was the second phase in which the two enemies combined. Both Godskin Noble and Godskin Apostle are close-knit and move together. But while there are pillars here that can help split the two, their other gimmick makes this feel pointless. Godskin Duo share a health bar. When one dies, it is later revived by the other, making this an endurance test.
It isn't impossible by any means, though, as dealing bleed damage and summons such as Mimic Tear can be employed to get the upper hand. Even using Sleep Pots can help incapacitate one Godskin while whittling down the other's health.
Aside from difficulty, Godskin Duo is lacking in other categories. The fight just doesn't feel too distinct, even from previous FromSoftware games. Also, Eurogamer notes that the reward for beating them is 170,000 runes — which is less than preceding bosses!
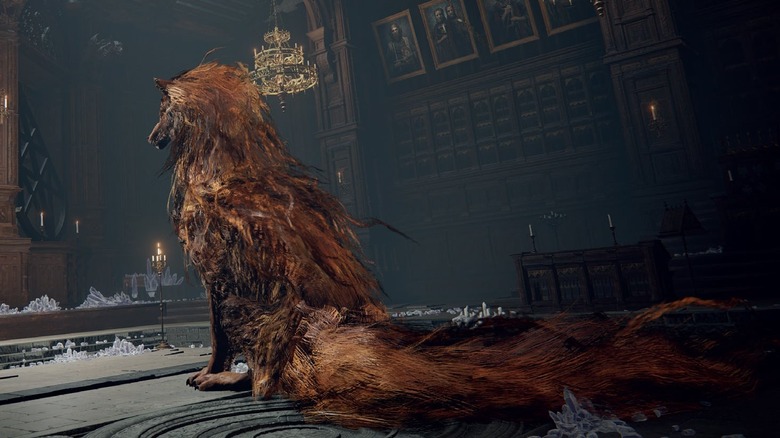
11. Fire Giant

Love him or hate him, Fire Giant is certainly unlike any other boss in "Elden Ring." A gigantic snowy arena is the locale for this duel. This may come as a shock at first, since it is one of the biggest boss arenas in the game. However, the player slowly comes to the conclusion that such a vast area is needed.
It can be a struggle, but there are ways to beat the Fire Giant. Slashing away at the omnipotent creature yields minimal damage and his powerful blows can be discouraging, but once the weak point in his left ankle is targeted, the boss's first phase becomes little more than a joke. But what follows is the real challenge.
The Fire Giant then resorts to moving on his knees, unleashing high-damage rolls and an array of ranged fire attacks that will completely obliterate a health bar. Dodging these is definitely easier on horseback, but it's still an obstacle, especially once his weak spot transfers to the left forearm.
Overall, Fire Giant feels very unbalanced and dull. It's a bit of a slog to face him. Fans are quick to hate on this encounter because of its seemingly unfair one-shot moves and wonky camera. Compared to other bosses, Fire Giant is just a big bag of annoyances, and being rewarded the Giant's Red Braid weapon or Burn, O Flame! incantation isn't worth the bothersome duel. There's a reason why so players are searching for ways to cheese him.
10. Godfrey, First Elden Lord (Golden Shade)
Godfrey isn't a terrible boss, but he is severely overshadowed by a later battle. In short, Godfrey wields his axe in easy-to-learn patterns and is restricted by only having one phase. He's a disappointing figure, especially after exploring the intricacies of the Royal Capital of Lyndell. Morgott, an epic antagonist by contrast, can be fought shortly after this battle, so Godfrey's inclusion is questionable.
After overcoming many deadly enemies and the maze-like labyrinth of Lyndell, the player is greeted by a golden spirit of the first Elden Lord. The trip from the nearest Site of Grace to Godfrey is at least interesting, as the Tarnished needs to circumnavigate tree roots to get to the boss room.
What follows is a serviceable foe with unique moves. Godfrey's axe maneuvers are quick and ferocious, and he has a stomp move that can disorient players who aren't quick enough to jump or roll out of the way. It can be tricky to know when Godfrey will pause his onslaught of attacks, but that's about it.
Some fans feel like this Golden Shade is such a tepid opponent because a later confrontation with Godfrey is more fleshed out and challenging. Again, it isn't a horrible boss, but it's curious that this form was included. Mainly, this is a surprisingly tame introduction for the First Elden Lord.
9. Draconic Tree Sentinel
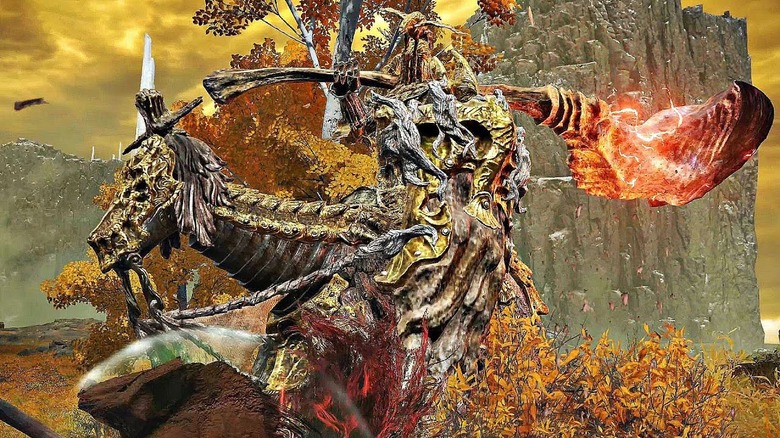
The Tree Sentinel enemy class on its own is an imposing rival. One of the first overworld bosses in the game, the earliest Tree Sentinel can either be avoided or met head-on. It's a tough match that early on, so some PTSD might kick in when meeting its evolved successor. Draconic Tree Sentinel, guards the Tarnished from entering Lyndell Royal Capital, effectively acting as a test that the player must pass in order to progress further into the Lands Between.
Draconic Tree Sentinel is able to be skipped if the player has advanced Ranni's questline to a specific point before reaching it. Otherwise, players are in for an epic clash on horseback, since the Draconic Tree Sentinel boasts a large repertoire of attacks.
Shield bashes, mace swipes, and fireballs are just a few moves executed by the Draconic Tree Sentinel — and that's just the first phase! The second is a wild departure in which the sentry summons red lightning attacks similar to those used by Lichdragon Fortissax. These attacks can stun the player and their steed, Torrent. The villain's mace can also obliterate health bars if not avoided properly.
Sure, it reuses a few assets from other Tree Sentinel enemies, but the Draconic version is different enough to be a high point in the game. It's ultimately is a fun jousting match and offers a great reward: unlocking more of the game's daunting map.
8. Rennala
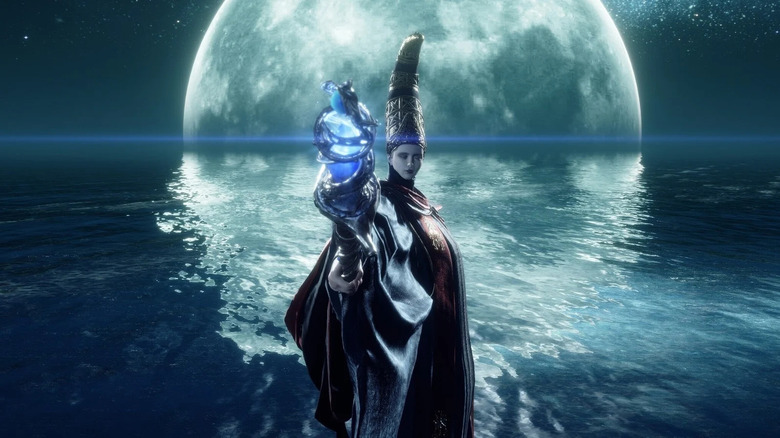
Gimmick bosses can be hit or miss. A seemingly fun combat segment can turn into an unsatisfying one if it hinges too heavily on the player figuring out the "trick." FromSoftware has a long history of gimmick fights, and "Elden Ring" kind of nails the formula. Rennala's first phase is the standard "figure out the trick" encounter, but her second phase is a more traditional and exciting skirmish.
Though she can be an optional fight — since "only two shardbearers must be defeated to gain access to Leyndell" — most players probably defeated her on the way to the area. This becomes more likely if you know she's far from being one of the hardest bosses in the game.
The objective of this fight is to find the highlighted enemy. Defeating enough of them will cause Rennala to fall from the air and break her barrier. Rinsing and repeating this will advance the fight to her second phase, in which she summons different creatures while executing various spells. The battle isn't too complex, however; the majority of Rennala's magic is easy to dodge, and focusing on her rather than her summons is a viable strategy. Even though it's a simplistic duel, the rewards and lore are enough to bolster Rennala's ranking.
Rennala is Ranni's mother and possesses one of the Great Runes, despite not being a demigod. This aspect is just one of the many hidden stories in "Elden Ring" that are worth exploring. Lastly, the reward for beating her is the ability to respec characters, which is incredibly handy.
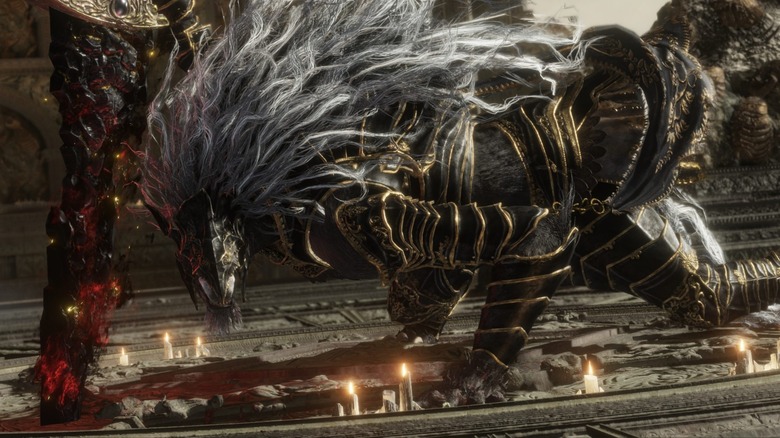
7. Red Wolf of Radagon
This enemy is a giant red wolf that swings a magic dagger in its mouth that can also summon spells. What more could someone ask for in an awesome battle? Red Wolf of Radagon has a lot going on, and it's a solid boss as a result. The Acadamy of Raya Lucaria is an in-depth environment with a lot of secrets to uncover, and Red Wolf of Radagon brings out the best of a memorable location.
The location of the boss is pretty unique: a lecture hall. The area features rows and rows of pews, so seeing them get destroyed as Red Wolf moves about is extremely exciting and frightening. Raya Lucaria is a school for magic, so having to defeat an animal magic-user feels both fitting and unique.
Youtuber theDeModcracy outlines the Red Wolf's moves and highlights how quick its melee attacks are, which makes the boss extra daunting. The wolf can either go in for a bite that is hard to avoid, or a slashing combo with its magic sword. Then things get really wild when the Red Wolf summons blue magic daggers that target the player. TheDeModcracy also addresses similarities to previous "Dark Souls" bosses like Great Wolf Sif. Despite the similarities, FromSoftware definitely went above and beyond with its latest iteration of wolf boss types. The setting and powers on display make Red Wolf feel unique.
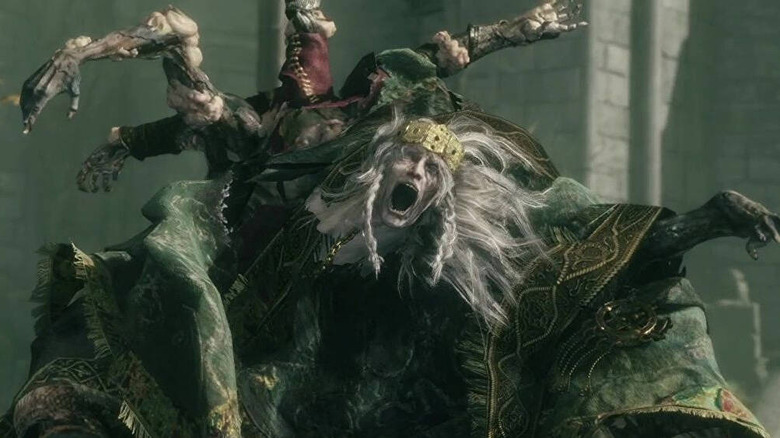
6. Radagon/Elden Beast
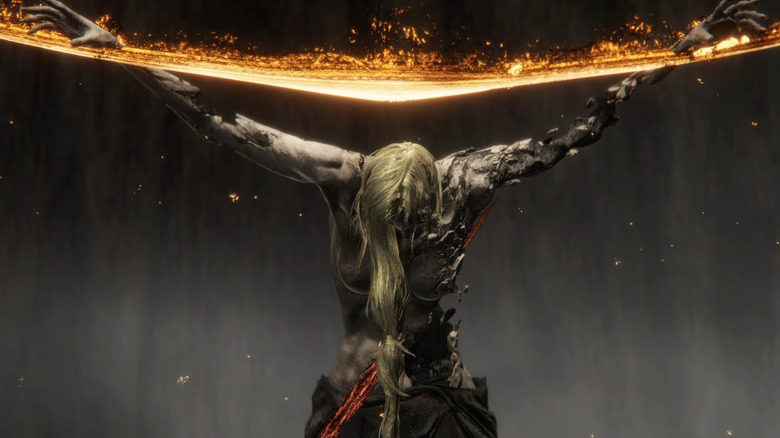
Queen Marika has a large role to play in "Elden Ring," as her demigod children are the primary opponents in the game. She is highly referenced throughout the adventure and a figure of much discussion throughout. The second Elden Lord, Radagon, makes up half of Marika, so it makes sense from a narrative standpoint for Radagon to be the final boss battle — the second phase of which is the humanoid form of the ring itself, the Elden Beast.
Radagon's moves center around wielding lightning bolts and slamming his hammer. They're awesome attacks that are made even more dangerous when combined with his teleportation and large area of effect. It's a shame that the Elden Beast is such a lackluster second phase in comparison.
Elden Beast's arena is jaw-droppingly gorgeous and the design of the creature is interesting, but the fight itself is pretty disappointing as a whole. The beast can swiftly move from one end of the area to the other, forcing the player to run back and forth in what feels like an infinite chase.
A good number of "Elden Ring" players have bemoaned the final phase of the last boss as feeling subpar. On its own, it's an adequate combat encounter, but it feels out of place and simplistic as a grand finale. The context for the fight is all there, since Marika and the embodiment of the Elden Ring itself must be overcome to reach the end. It just feels exceedingly inferior, especially when compared to other FromSoft finales like Isshin Sword Saint or Orphan of Kos.
5. Margit
Arguably the first truly big hurdle in "Elden Ring," Margit has become something of a legend in the gaming community. Outlets like GameRant have noted that many players have struggled against this early boss, but he is a great example of why the level of choice afforded to "Elden Ring" players is so great: You can either make a straight shot to him or explore and level up a bit before attempting the fight. Like Draconic Tree Sentinel, Margit is basically an exam that the gamer must ace to become one step closer to the title of Elden Lord.
And in that sense, Margit does not disappoint. He swings his large cane and summons magic daggers and a massive hammer. These make for grand spectacles, but the way they're used to attack is incredibly clever. Margit's tells aren't totally obvious, mainly due to the sheer amount of feints he uses.The fight asks a lot out of the player, especially so early in the game. But if you can manage to finish him off, Margit's shackle has hidden alternate uses once the player takes it for themselves.
Lastly, the presentation is phenomenal; Stormveil Castle is the backdrop of the conflict, with Margit standing before the gates to block your path. Swords, spears, and other weapons are stuck in the ground all around, noting previous failed battles prior to your arrival.
4. Morgott
Margit's second phase sees him summoning a hammer that he crashes into the ground after a giant leap. As scary as that is, imagine a boss who uses that first. Enter Morgott: Margit's alter ego and the last stumbling block before finishing Lyndell the Royal Capital. Morgott is a sort of remixed version of Margit, but he's much more than a copy-and-paste job.
As previously stated, Morgott begins with an upgraded variation of Margit's second phase. Summoned swords rain down from above as a long-ranged spear and new hammer combos are utilized against the player. Besting him is difficult, thanks to his quick speed and nearly endless combos. Where Morgott comes into his own is during his second phase. During this part of the fight, he causes the ground to rupture and gains additional blood-flame attacks, which can create lingering slashes. Furthermore, he can impale the protagonist and cause a huge loss in health.
After defeating Morgott, his Remembrance can be exchanged for either a wraith attack or Morgott's Cursed Sword, which comes with special moves that mirror Morgott's own abilities.
Morgott asks the player to apply everything they've learned in the game thus far. As such, he's a formidable opponent who yields plenty of rewards after finishing him off.
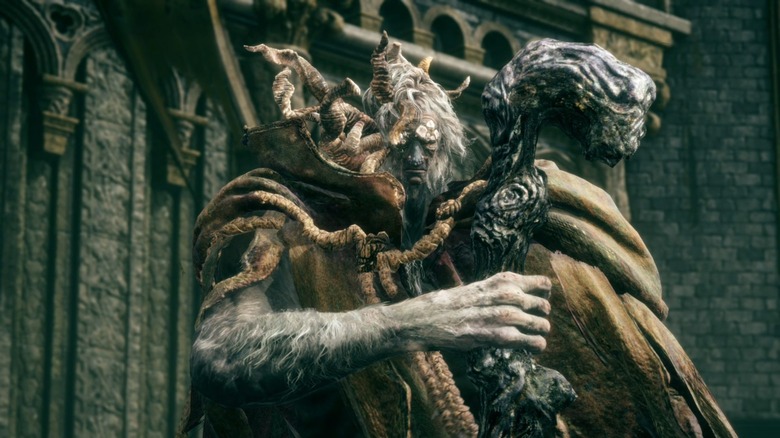
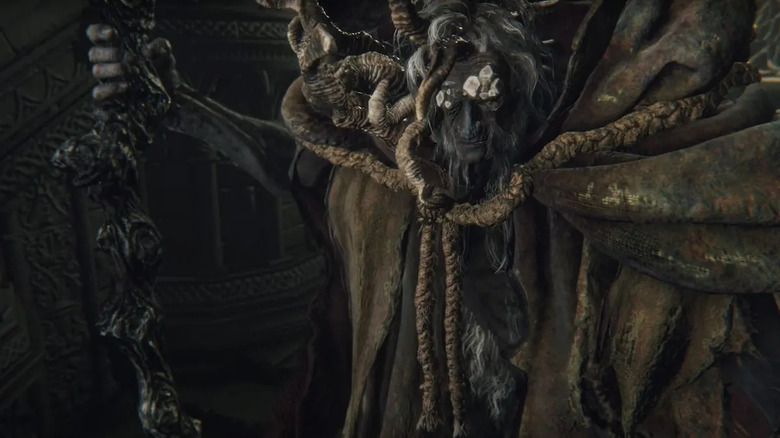
3. Malekith
Malekith is the epitome of a cool boss. A bursting black and red sword that decreases the health bar and lightning-fast maneuvers are just a few noteworthy features for this late game boss. Contrary to other bosses, Malekith is significantly different between phases. His first phase, Beast Clergyman, has a very different design from the second phase. It can be jarring to realize you have to overcome both phases, making some players pull their hair out in frustration.
Found in Crumbling Farum Azula, this boss is one of the more difficult challenges. Beast Clergyman is pretty straightforward — with some delayed slash attacks and thrown projectiles — but things get really difficult after the change into Malekith.
The player is immediately greeted with sword slashes that drastically decrease the health bar. This health cannot be regained, so once it's dropped, it can't return to normal until you die and restart the fight. If that's not enough, the beast moves around rapidly as if the arena is his own personal playground. As YouTuber theDeModcracy puts it, Malekith "flies around like Dante from the 'Devil May Cry' series." It's something of a spectacle that no other boss performs.
Winning the boss battle nets players a whopping 220,000 runes and his Remembrance, which can be used to obtain either Malekith's Black Blade or the Black Blade incantation. The incantation emits a wave of light similar to Malekith's own special move, while the blade itself recreates his sword attacks. Basically, sticking it out with this creature is worth it in the end.
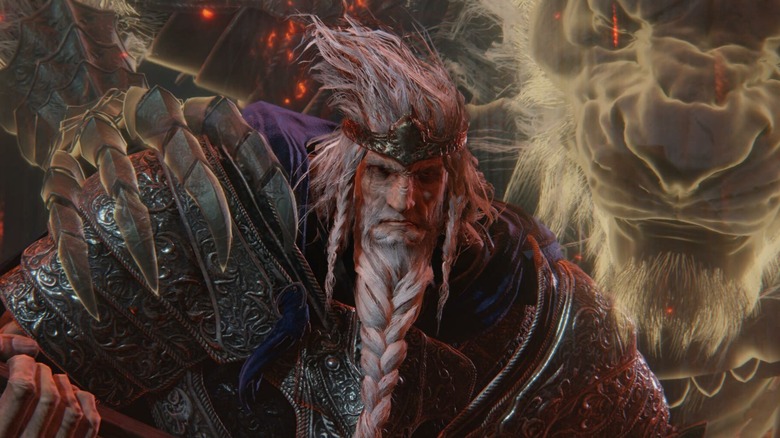
2. Horaah Loux, Warrior
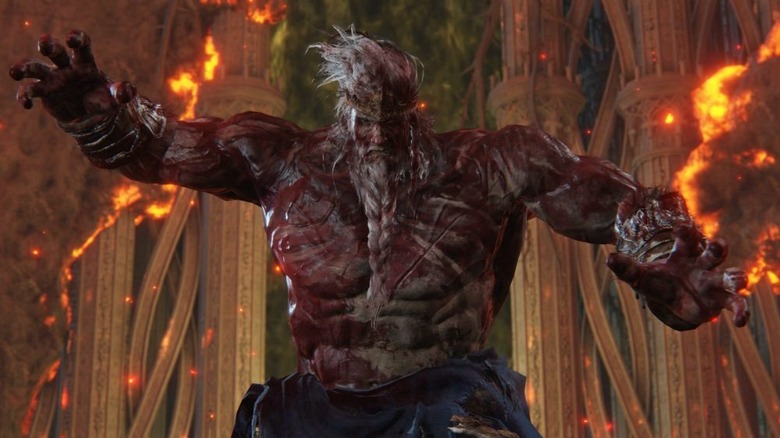
Remember Godfrey's Golden Shade? Well he returns as the second-to-last boss. Rather than a spiritual presence, Godfrey finally appears in the flesh. His first phase is familiar, because it's ripped straight from the Golden Shade fight, axe and all! However, he has some new tricks this time around. In an act of desperation, he transforms into Hoarah Loux, where his moveset and patterns are completely different.
Hoarah Loux abandons the axe completely and opts for grappling moves. His power bomb on its own is brutal: He lunges at the player, tossing them into the air and slamming them down to the ground. This is joined by earth-shattering moves that must be avoided by jumping or well-timed rolling.
Although the arena is repeated from Morgott's battle, the fact that Hoarah Loux can split it in half with one of his strikes is reason enough to allow the reused asset. This boss is the full package, complete with a devastating move set and an epic boss theme.
A Remembrance is received from this boss, which can be traded for one of two options. The first is an Ash of War move that replicates Hoarah Loux's ground-breaking maneuver. The second is Godfrey's infamous axe. It's a difficult choice, because both feel essential. Either way, it's a grand reward for duking it out with this beast of a boss. As a whole, Hoarah Loux is a huge improvement over the first Godfrey fight and is a showdown worthy of the title of First Elden Lord.
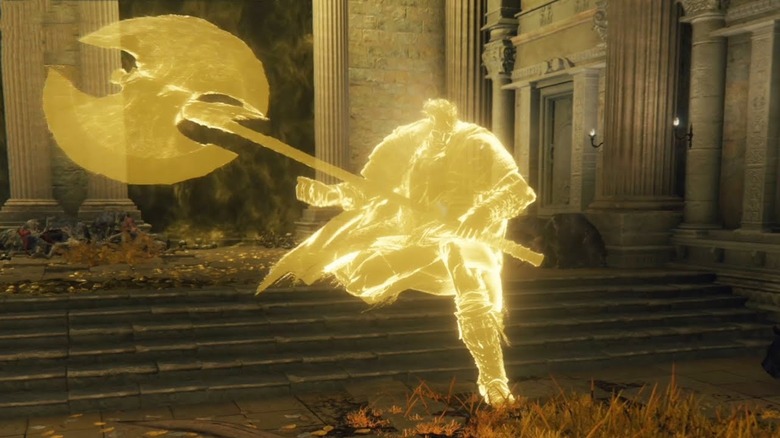
1. Godrick
Son of Godfrey, Godrick the Grafted is a demigod who is fought at the end of Stormveil Castle. His multiple arms are all incorporated into his sword swings and lunging attacks. It's a zany boss design that gets even zanier in his second phase. Dragons are a theme in "Elden Ring" so the fact that Godrick incorporates Dragon attacks makes this one of the most memorable antagonists in the entire game, if not the most impactful.
Firstly, the arena is amazing. The decrepit cemetery, dragon's corpse, and autumn leaves set a mood, while the narrow layout feels claustrophobic and encourages strategy. Altogether, it makes for a scene that feels more like a final boss setting.
Godrick himself is ferocious. He flings his axe around with immediacy, joined by wind effects that blast forth after some swings. And when his health bar gets to a certain point, Godrick undergoes an extreme metamorphosis. A mid-fight cutscene depicts Godrick slicing off his own hand, ripping off the dragon's head from its corpse, and attaching it to his own body. It's absurd and fantastic. This leads to fire attacks being added to an already diverse move set. What's even better is being able to use Godrick's Remembrance to copy his dragon head move with the Grafted Dragon weapon or attain the Axe of Godrick.
This is a remarkable early boss fight that perfectly sets the tone for the rest of the game.