Where To Find Every Skull In Halo Infinite
"Halo Infinite" is making "Halo" fans and critics alike happy with its snappy, free-to-play multiplayer mode and a decent-sized campaign that takes the series' storyline in a modern direction. With that in mind, fans of the franchise will rejoice to learn that collectible Skulls are also making a return with "Infinite." In keeping with tradition, these items are the toughest collectible to find in the game and you are absolutely going to need a guide to find all 12 of them.
First introduced in "Halo 2," collecting Skulls allows players to turn on unique gameplay modifiers that include changes to difficulty and additional weapon effects. Five of them are found during campaign missions that cannot be revisited. Since the game doesn't allow you to replay campaign missions (at least not yet), it is important to make sure to discover those particular missions' Skulls on your first pass.
Whether you are a completionist looking for them all, or you just want to know where to find the Blind Skull that turns off the HUD, here is a complete guide of where to find every Skull in "Halo Infinite."
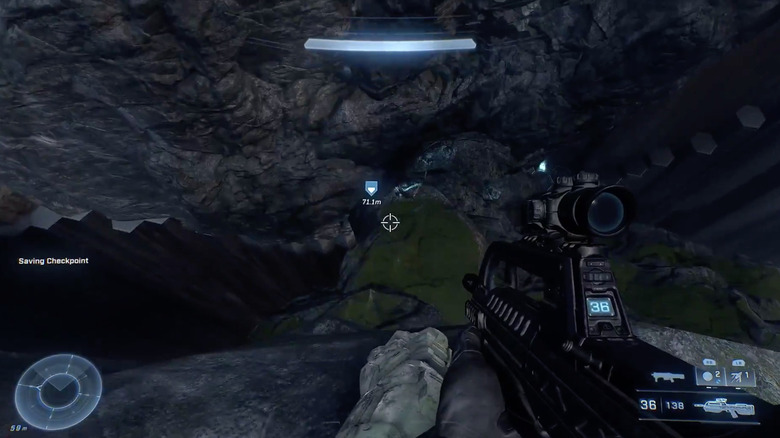
Boom Skull
You can find the Boom Skull in the opening mission of the "Halo Infinite" campaign. This one is fun and well worth getting, since it doubles the radius of all explosions when activated. It's also pretty easy to find.
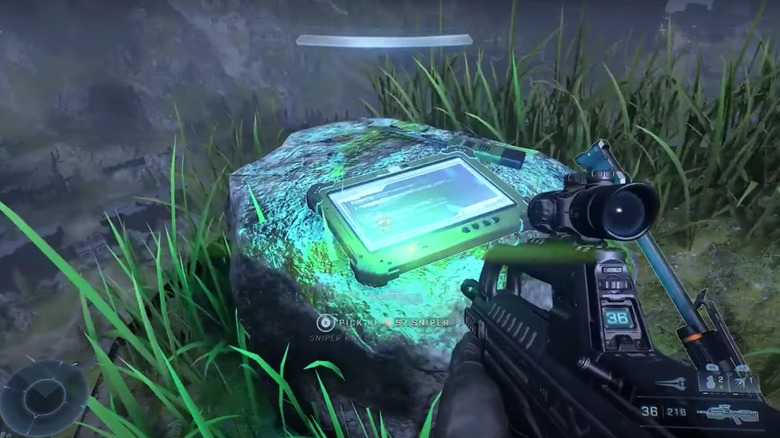
While aboard the Waship Gbraakon, after you exit the room with the AR projection, you will enter a small room with several stories and a wall with ascending platforms on the right side of the room. If you face the middle platform, the Skull will be up and to your right. Just hop on (or grapple up to) the lift, ride it up two stories, and the Boom Skull will be right in front of you..
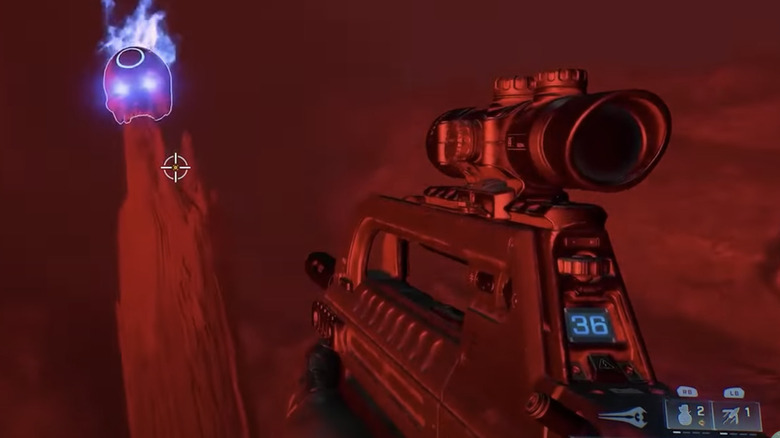
It's worth noting that for every Skull on this list, your Radar Pulse is an invaluable tool. The Skulls will not be automatically marked on your map like the other collectibles, but if you know or suspect you can find one nearby, you can always ping using the Pulse; the Skulls will appear through the walls and on your map, just like other items of interest.
Cowbell Skull
The next Skull is found in the second mission of the game, "Foundation," and it is the last one you must find before the game's open world becomes available — otherwise, you'll miss your only chance to nab it on your current save file. The Cowbell Skull, introduced in "Halo 3", increases the effect of explosions on the acceleration of objects in the game. Meaning if you turn it on, things will fly even further when hit, lending more chaos to an already chaotic shooter.
In "Foundation," you will experience a flashback cutscene on an elevator. This is when you get The Weapon, your AI companion. You will enter a room with a window that opens into a high-ceiling atrium. Once you enter and wipe out the enemies, go back to the entrance, turn around to face the window from the opposite side and look up. If you ping now, you should be able to see that the Skull is located on a support beam high up in the room. Using a couple strategically placed Grappleshots should get you up to the Cowbell Skull in no time.
IWHBYD Skull
The "I Would Have Been Your Daddy" Skull (or "IWBYD") is well known among "Halo" players. This Skull activates more dialogue options from enemies and Marine, making it a favorite since its debut in "Halo 3." Once you get it, there's no real reason to turn it off — so why not snag the IWHBYD Skull as fast as possible?
The Tower is one of the earliest main mission locations in the game's open world. You can find the IWHBYD Skull on the roof. The quickest way to get it is to have upgraded your Grappleshot cooldown a couple of times. If you haven't done that, you'll have to wait until you have access to a Banshee or another flying vehicle later in the game.
If you are going for it early in your playthrough, you can use the Grappleshot to scale the side of the Tower, recharging every few ledges. Once you've nearly reached the top, you will need to grapple twice in quick succession. First, fling yourself up by grappling to the ledge hanging down from the Tower's peak. Then, you'll need to turn and face the Tower so you can grapple to the top and pull yourself up. The IWHBYD Skull is located on a platform on the roof.
Blind Skull
The photographer's favorite, the Blind Skull disables the HUD and can be found in the open world of "Halo Infinite." Like the IWHBYD, this Skull can be found early on in the game, on the first island. In the southernmost area of this first map, you can see a huge canyon — head that way.
Approaching from the North, you are going to want to climb the Western mountain. Once you get high enough, walk along the edge while looking down and you'll eventually see some blueish fluid and what looks like a body. Drop down there to take a closer look. You'll know you are in the right place when a Banished dropship flies overhead and attempts to shoot you.
Once you start to see dead marines and weapons laying on the rock formations, take note of the blue lights that illuminate a path. Follow these down by using careful jumps and grapples and you'll find a series of platforms. Once you reach the end, the Blind Skull is there for the taking. You can also easily reach this Skull later in the game by using the Wasp.
Catch Skull
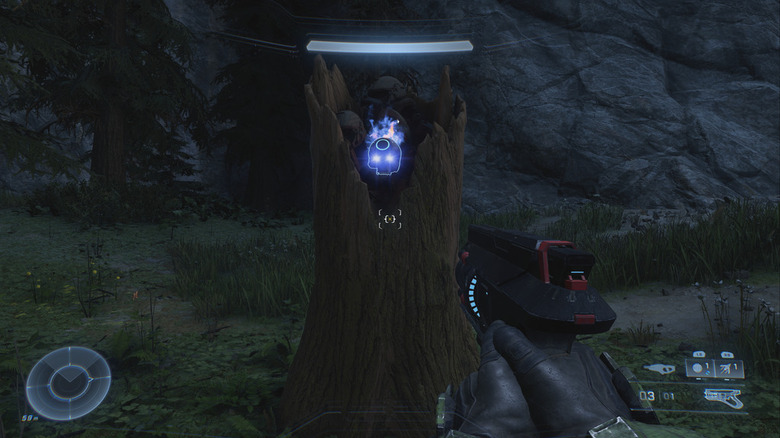
The second island to the north is where you will find the Catch Skull. This one isn't super well-hidden, but it is guarded by two powerful enemies. You are going to have to fight two Hunters (or cleverly evade them) if you want to be able to play a "Halo" with "Infinite" grenades (get it?).
Well, okay, that's not quite how it works. But the Catch Skull does increase the amount of grenades enemies use, while also greatly upping the chance of Grunts dropping them upon death.
To the north of Outpost Terminus on this landmass, you will find a lake. Ping it and the location of the Skull will be revealed. It is hidden in a tree stump nearby, where you might also find some morbid environmental storytelling. All you have to do is kill the Hunters, or engage them to draw them away from the area, and then run back to the Skull. Easy-peasy, right? Good luck.
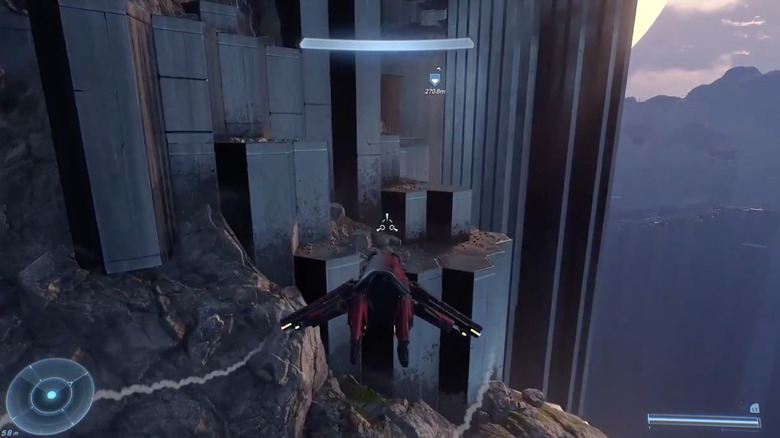
Fog Skull
The Fog Skull can be found on the same landmass as the Catch Skull. You will find the Skull at the edge of the map, west of the FOB Alpha base. This one is tricky if you haven't unlocked the Wasp yet. If you have you can, as always, just fly to the Skull once you know its hidden location and avoid all the Grappleshot shenanigans.
If you have to use Grappleshot, walk up the cliffside on the western edge of the map until you start running into a towering mass of hexagonal pillars. Drop down to where you see some friendly marines and keep running until you find a gap. Jump and grapple your way across. From here, you can ping your Pulse for the Skull and see where to go next. Grapple up the pillars and eventually you will make your way to a platform where you need to be. You'll find some scattered weapons in this area. The Fog Skull is sitting on the floor next to some desecrated armor. This one disables your radar when you activate it in the menu.
Famine Skull
The Famine Skull is another throwback to the classic Bungie days of the "Halo" franchise, when Skulls existed mostly to make the game really tough. Famine, as it always has, makes it so that enemies' dropped weapons have only half of their ammo when you pick them up. That's brutal stuff on Legendary difficulty — and hilariously, this one is pretty easy to find.
You absolutely need a flying vehicle to get this one. By the time you are at the fourth Island, it should be easy to spawn one at a FOB, or Forward Operating Base. Check your map first and you'll see a small island just south of this area's beacon. Fly around to the far side of the landmass and land your vehicle. Then, just Radar Pulse to view the location of the nearby Skull and grapple and/or jump your way up to it. You will find the Famine Skull on the corpse of a long-dead Elite soldier holding a Pulse Carbine.
Thunderstorm Skull
Using a vehicle, you can get the Thunderstorm Skull without sweat, but here's how to do it using only your hands, feet, and your trusty Grappleshot. This one is south of the easternmost Banished anti-aircraft gun and near Island 4's north beacon. In this area, you can find it on top of a lone pillar. If you can fly here using a Wasp, you only need to use the grapple to propel yourself repeatedly up one tall pillar — an easy feat at this point, since you'll likely have upgraded cooldown times for the Grappleshot.
If you want to go on foot, you can climb up a nearby hill overlooking the pillar. At the top you'll find a Sniper rifle and a UNSC audio log. It may be confusing to get up there, but you'll know you're close once you've reached this audio log. Use the sniper to look down over the cliff and you should be able to spot the Skull from here (or just trust that it's there).
It's a long jump down, but you will be able to make it to the pillar holding the Skull. Don't worry if you land on the platforms below, because you can easily propel yourself back up. Also, don't rush to turn it on right away or you'll be in for a tough fight. The Thunderstorm Skull upgrades the rank of most enemies, making them instantly smarter and more deadly.
Black Eye Skull
This one is also located on Island 4, in the southern reaches of Zeta Halo. The Black Eye Skull is named quite literally, as you will take some licks when using it. When activated, you can only recharge your shields through melee attacking enemies, forcing you to play up close and personal. With the Grappleshot aiding you in closing that distance, playing with this Skull active could be extra fun.
It's not too tough to access, either. On the south side of the map, between FOB Kilo and Riven Gate, there is a large waterfall. Approach the waterfall and ping the Skull to learn its nearby location. Use the Grappleshot on the right edge of the waterfall. It won't take you all the way up, but you will land on an easy-to-miss platform. You'll hear the noise indicating the presence of a Skull, so just crouch and look around to discover the secret cavern where the Black Eye Skull is hidden, perched atop a stalagmite.
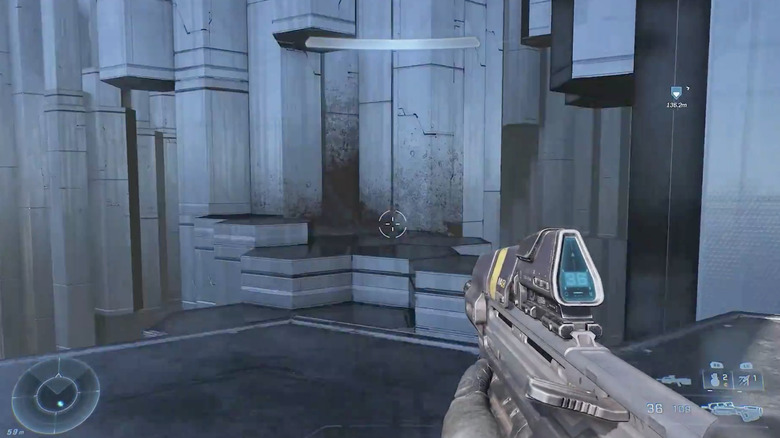
Mythic Skull
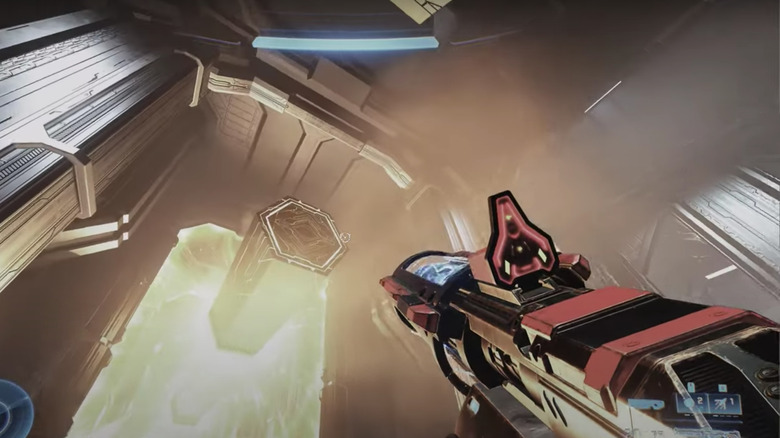
Like the first two Skulls on this list, the Mythic Skull is only obtainable in one of the game's story missions. This is the case for all three final Skulls in the game, as "Halo Infinite" opts for a more linear and directed set of final levels, rather than the open world seen in the majority of the game. If you want to increase health for all enemies, you can find the Mythic Skull in the mission "The Command Spire."
In this mission, you will find a series of expansive rooms containing floating pillars. They're hard to miss, because each pillar will slowly disappear one-by-one into a swirling golden light. Clear out the enemies before you proceed.
Head on to the area where the floating pillars are making right-hand turns overhead. Grapple up onto a beam that will afford you enough room to reach the pillars. When one of the pillars makes its mid-air turn overhead, grapple up to it. Face the wall and look up to grapple to the ledge above you.
Just above your head will be another platform with a glowing blue door. Grapple up to that tiny platform and follow the connected hallway to get your hard-earned Skull.
Grunt Birthday Party Skull
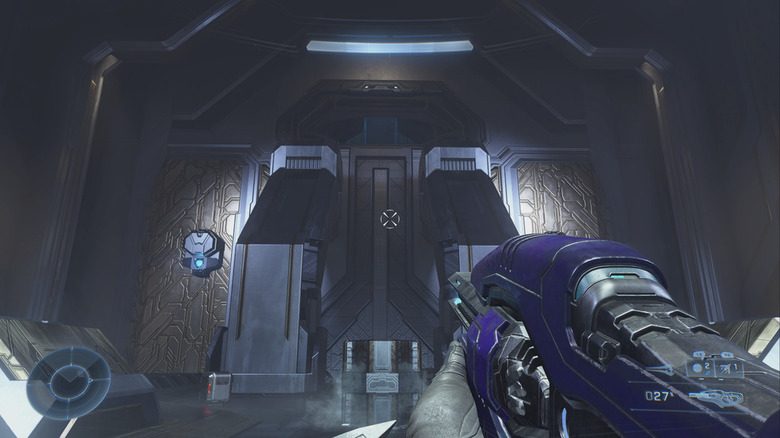
You can finally snag the Grunt Birthday Party Skull in Mission 12, "Repository." This one is definitely the most complicated to reach, but since this is the one that causes a hilarious explosion of confetti when landing a successful headshot, you're going to want it.
During the mission, you will enter a cavernous room with a terminal in the middle and two light bridges to the north and south. After fighting the Banished that spawn, it's time to grab a Power Seed. On the far walls to the east and west of the terminal, you'll notice a pair of doors. You'll have to grapple to the eastern door (the one on your right) and go through it.
At the end of the hall, you'll find a Power Seed that needs to be delivered to the western door. Grapple to that side with the Seed in hand. Here, you will find a spot at the end of a corridor for the Power Seed to be placed. Once you have done this, you” hear a loud chime. You still have to wait to get that coveted Skull, though.
Later in the level, following a cutscene involving The Weapon, you will reach a pair of rooms with golden walls. At the top of this second room, you can spot a conspicuous open window. Grapple up to the windowsill and prepare yourself. The room beyond contains four invisible Elites who are armed to the teeth. Take them down and your reward is the Grunt Birthday Party Skull.
Bandana Skull
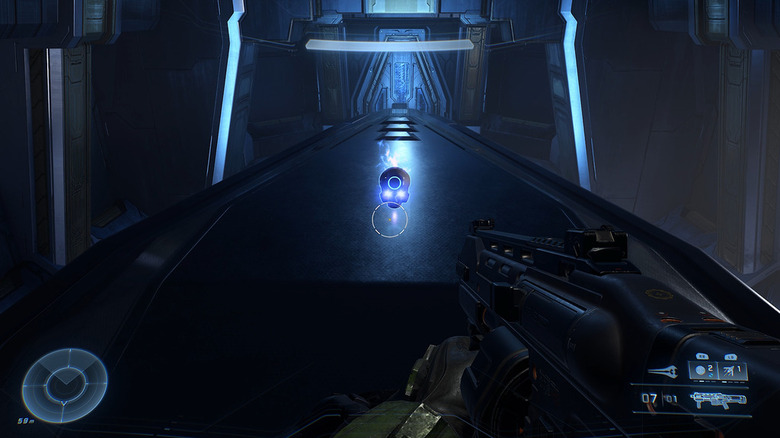
The final Skull in "Halo Infinite" lives up to the game's title. The Bandana Skull can only be found in the final mission of the game, "Silent Auditorium," and it not only gives the player infinite grenades and ammo, but it also removes all cooldowns from Master Chief's abilities. You won't get this one unless you know exactly what to do, so it's especially worth it to use a guide for this one.
The first thing you'll want to do when the level starts is not kill any Sentinels. If you can complete the mission without shedding Sentinel blood, then a door near the end of the level will be unlocked. Right before ascending in the final elevator, look around and you'll see a light bridge — which disappears if you've killed even a single Sentinel. Walk across the bridge and through the door to find the ultra-valuable Bandana Skull atop an easy-to-reach platform.